FAQs about vacuum pressing veneering and laminating
Vacuum pressing for use in the woodshop explained
- Vacuum: What is it?
- How is vacuum measured?
- How does vacuum work for the woodworker?
- What kind of vacuum pumps are available?
- Advantages Air-Powered or Electric Vacuum Pumps
- Automatic Vacuum Systems for Veneering:
- Manual Veneering Systems:
- Bags and Bag Material:
- Frame Presses:
- Vacuum Bag Connectors:
- Other Considerations:
- Vacuum Clamping
- What is Vacuum Clamping?
- Vacuum clamping considerations:
- Air-Powered vs. Electric Vacuum Pumps for Vacuum Clamping:
- Factors to consider in selecting a vacuum system:
- What kind of Glue should I use in a vacuum Press?
- How Long does it take for the Glue to Dry?
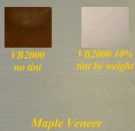
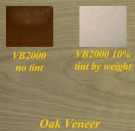
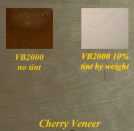
- What is the color of VAK-Bond 2000 once it dries?
- Differences in Glues
- Typical Glue Problems
Vacuum: What is it? The absence of matter. A space that contains air or gas that is at less than atmospheric pressure.
How is vacuum measured? Vacuum level is usually measured in terms of inches of mercury ("Hg). This is the same term used when the weatherman reports the barometer reading "the barometer is 29.21"Hg and falling". The maximum vacuum that can be achieved on a standard day is 29.91999.
Inches of water is another term used to measure vacuum where 1"Hg = 13.6"H20. Inches of water is normally used when measuring low vacuum or air pressure. Vacuum can also be measured in torr, microns, mbar, atmospheres, however, these terms are not usually used in the woodworking area.
Your elevation from sea level affects the amount of vacuum that can be achieved. A rule of thumb is to subtract 1"Hg for each 1000' above sea level. Thus if a pump normally reaches 27"Hg at sea level, then in Denver (5000' above sea level) it will only get 22 - 23"Hg.
How does vacuum work for the woodworker? The answer is simple; atmospheric pressure is applying approximately 15 pounds/sq.in. (psi at sea level) of force in all directions. With the vacuum pump we remove most of the air from one side of the wood (creating vacuum), thereby the atmosphere pushes the wood from the other side. This push or force is easily calculated by reading the vacuum gauge and multiplying the reading (called vacuum level) by .5. Therefore, if you are applying 26"Hg to 1 sq.ft. of wood, you will generate 1872 lbs. of Clamping Force. (26 X .5 X 144 sq.in.). This force works to hold wood for machining (routing, sawing, sanding, etc.) or for applying veneer or making built up laminations.
What kind of vacuum pumps are available? There are two types of vacuum pumps, air-powered or electric. Within each type there are different styles. For example the air-powered (Venturi) units can be single or multi-stage. The electric pumps can be oil-less or oil-lubricated, diaphragm, reciprocating piston, rocking piston, rotary vane, rotary screw or lobed rotor pump. Remember, if the pumps are of equal capacity, one type of pump does not give a better vacuum. Vacuum is vacuum, whether it's created with a pump or sucking on a straw.
Advantages Air or Electric Vacuum Pumps
Air-Powered:
- High Reliability - No moving parts, nothing to wear out, break, or overheat and shut off.
- Lower Cost - Compared to an equivalent capacity electric pump and air-powered vacuum system can be 15 to 40% lower in cost. No maintenance or replacement costs for the pump.
- Upgradeable - Add increased performance or function without losing original investment.
Electric:
- Convenience - Can plug it in anywhere, no compressor required.
- Capacity - Can have more capacity if you only have a small compressor.
Pump Capacities and how they are defined:Vacuum pumps are usually defined by two parameters; vacuum level (as defined earlier) and vacuum flow. A third parameter not usually discussed in the woodworking industry is the time to evacuate a given volume (usually 1 cu.ft.) a given vacuum level.
Vacuum Level ("Hg) is thought of as the force or work that vacuum can do. The higher the vacuum level, the more force that is applied. If we have 1 sq.ft. (144 sq.in.) board under 20"Hg, we have 1440 lbs. of force holding the board in place (144 X 20 X .5).
Time to evacuate is important when you must get to a given vacuum level in a specific period of time. General industries use this information to calculate the speed of a particular operation in the assembly line. Generally, most woodworking applications are not affected by a slight time difference. Whether it takes 65 seconds or 75 seconds to evacuate a vacuum bag is not critical.
Where time to evacuate can be important is where large curved pieces are being made. A large curved form could have anywhere from 10 to 20 cubic feet of air to evacuate and a 1/3HP pump could take a half minute to evacuate 1 cubic foot to 20"Hg (where the bag is tight and applying pressure). Thus, for 20 cu.ft., it would take 10 minutes to get the bag to 20"Hg (.5 min X 20 cu.ft.) If we look at the total time involved; it may take 10 minutes to assemble the piece and get it in the bag, then another 10 minutes to get the whole bag to an acceptable vacuum level with a 5CFM pump. A total of 20 minutes may be too long, as the glue could set before sufficient pressure is applied. A better solution is a faster pump of 10CFM, which would cut the time to evacuate in half. Other tools such as a glue spreader would help reduce assembly time thereby decreasing total time to get the work piece under pressure.
Vacuum Flow:
is the volume of vacuum air (measured in cubic feet per minute [CFM]) pulled in by the pump at a given vacuum level. Therefore, vacuum flow changes (decreases) as vacuum level increases. It is an inverse relationship. A pump will have its highest flow at 0"Hg and no vacuum flow at its highest vacuum level, i.e., it can't pull in any more air. Be aware that vacuum flow at 0"Hg can be misleading (no work is done at 0"Hg). When dealing with porous materials, higher vacuum flow capability will mean higher vacuum levels, which translates into more holding force.
Time to evacuate can be important in some applications. As mentioned above, time to evacuate a given volume of air varies at different vacuum levels. This concept is true for all types of pumps, whether air-powered or electric. For example, a 1/3 H.P. electric pump may evacuate 5 cubic feet per minute (CFM) at 0"Hg, however, at 20""Hg it will only pull 1.5 CFM. Another manufacturers 1/3 H.P. pump may pull 5CFM at 0"Hg and at 20""Hg pull 1.2 CFM. Thus, the second pump will be slower.
Time to evacuate is important when you must get to a given vacuum level in a specific period of time. General industries use this information to calculate the speed of a particular operation in the assembly line. Generally, most woodworking applications are not affected by a slight time difference. Whether it takes 65 seconds or 75 seconds to evacuate a vacuum bag is not critical.
Where time to evacuate can be important is where large curved pieces are being made. A large curved form could have anywhere from 10 to 20 cubic feet of air to evacuate and a 1/3HP pump could take a half minute to evacuate 1 cubic foot to 20"Hg (where the bag is tight and applying pressure). Thus, for 20 cu.ft., it would take 10 minutes to get the bag to 20"Hg (.5 min X 20 cu.ft.) If we look at the total time involved; it may take 10 minutes to assemble the piece and get it in the bag, then another 10 minutes to get the whole bag to an acceptable vacuum level with a 5CFM pump. A total of 20 minutes may be too long, as the glue could set before sufficient pressure is applied. A better solution is a faster pump of 10CFM, which would cut the time to evacuate in half. Other tools such as a glue spreader would help reduce assembly time thereby decreasing total time to get the work piece under pressure.
Vacuum Systems for Veneering: In addition to having a choice between air-powered or electric, you have a choice of an automatic or manual system. The only reason for selecting a manual system is lower cost. An automatic system will get to vacuum level (about 25"Hg) and then shut the pump off. When the vacuum level drops to about 20"Hg, the pump automatically turns on and will shut off again, when it reaches 25"Hg.
If you develop a leak in the bag, the pump will cycle on and off at a constant rate consistent with the size of the leak. Constant cycling on and off is detrimental to an electric vacuum pump. When any motor starts, it draws higher amperage than when it's running. This causes more heat buildup and the motor will shut off or worse burn out. Most vacuum pump motor have a built in thermal overload that will shut the motor off when it overheats. It could take 15 to 30 minutes for it to cool off and restart. This would mean the job is lost.
Air-powered pumps do not have a heat problem; they actually run cool because of the air running through them. In some cases the exhaust air ends up cooling the other electrical components used in the automatic controller. Dirty or unfiltered compressed air can sometimes cause problems with air-powered systems. Rust or dirt can prevent an air solenoid from closing, thus the air-powered pump would continue to operate until the air-line is removed (this is better than having it break and be out of commission). Normally, cleaning a solenoid is a 5-minute process. A filter on the air-line will prevent this problem.
Manual Veneering Systems: When cost is a factor a manual system is a better alternative than veneering with most mechanical clamping set-ups. A manual system does not have any automatic control to shut the pump off. You either turn the pump on and let it run until the glue dries or shut it off when at vacuum level and come back periodically to make sure you have enough vacuum in the bag. If the bag is tight, it can hold vacuum for hours or even days. However, be warned that a bag can start leaking at anytime.
An automatic system is strongly recommended if you fall into one of the following:
If you must start with a manual system, remember that some manual systems are upgradeable to the automatic system without losing your original investment.
An automatic system is strongly recommended if you fall into one of the following:
- Do veneering on a regular basis - even 3 or 4 pressing per month.
- Want the convenience of turning it on and walking away without being concerned about having to check it every 15 to 30 minutes.
- Loss of one job will equal the additional cost of an automatic system. If you lose one job, what is the cost of your labor and materials? Generally, the additional cost of an automatic system is only $250 - $300 more than a manual system.
If you must start with a manual system, remember that some manual systems are upgradeable to the automatic system without losing your original investment.
Bags and Bag Material: The woodworking industry usually uses either vinyl or polyurethane to make the bags. Some bags are seamless, i.e.; they are tubes with end closures to seal each end once the job is inside the bag. Seamless bags offer more reliability, as you do not have to be concerned with a seam delaminating. If they do delaminate, some vendors offer a lifetime warranty on the seams.
Polyurethane is an industrial grade material and is much tougher than vinyl. Poly will stretch better, return to its original shape better, not cut as easily nor develop pinholes as readily as vinyl. Poly is usually available in .020, and .030 thickness. Poly is a better choice for those doing curved work, as it holds up better than vinyl, when stretched. The thicker the bag, the more abuse it will take. Thickness can be a disadvantage when doing some curved work. It may bridge across in some areas instead of flowing or stretching into the curve. If this happens you will not get pressure where it bridged and the job will have to be reworked or scraped.
Vinyl bags are available in .020" and .030" thicknesses and are usually purchased when funds are limited or it will have limited use. For example, pressing 10 flat panels a month with a .020" vinyl bag should last a year or two if normal care is taken. Some vinyl bags are made with two different types of material. The top is clear and the bottom opaque. If the bag is made with clear material, top and bottom, then the bag can be turned over if it has the removable type connector described below. These two features, clear top and bottom and re-locatable vacuum connector, mean more life from the bag. What happens is the top of the bag gets cut and patched as well as stretched. The stretching causes pinholes to develop and thus the bag leaks and it's not practical to patch the pinholes. With a clear bag and re-locatable connector, the connector is removed and the hole patched. Then the bag is turned over with the bottom now on top. The top side is basically unused. The bottom will self-seal against the bottom of the baseboard (usually 3/4" melamine coated particleboard which the work piece sits on) or platen because it doesn't have the grooves in it like the top of the platen. This simple feature allows you to get almost twice the life out of your bag.
The bag can also be used without a baseboard. For example, those doing curved staircases or arches. In these cases, the form is outside the bag. A long narrow bag is used where the laminates are glued, put in the bag, formed around the arch and vacuum pulled on the bag. The vacuum now holds the arch in its shape and the bag can be removed from the form. In this particular situation, the form can be used again without waiting for the glue to dry. One vacuum system can handle several bags at the same time, all with one form.
Another use of vacuum bags without a baseboard is for free forming curved laminates. In the above example we used a form to get the shape of our arch. In free forming, it's just that. The laminates are glued, put in the bag and then bent into any shape before vacuum is applied. Once vacuum is applied, the shape is maintained because the laminates are being pressed together by 1800 lbs/sq.ft. of pressure, thus they can't slide or move. The general rule of thumb is "if you can bend it into a shape, the bag will hold it".
In general, a vacuum bag offers more flexibility in what types of geometry or shapes that can be pressed in the bag verses a frame press. If you are doing a variety of work, flat, curved, etc., then a vacuum system with a bag is the best way to start.
Frame Presses: If you press many large flat panels, the frame press is a better choice than a bag. The panels can be assembled in place and more than one can be pressed at a time. Some will allow you to stack 10 or 15 panels in one press, so limited production work can be achieved at a very low cost. Also, large production shops can use a frame press for making curved panels off the main production line. You do not have to move the panels; the frame is hinged to the back of your table and closes down over the work. The frame press is more limited in the geometry that it can be press. For example, you cannot do a large round cylinder in the frame press; however, it can be done in a vacuum bag.
Vacuum Bag Connectors: Vacuum bag connectors vary by vendor. Some weld or glue a donut or flange to the bag and attach the vacuum hose at this point. The vendor determines the point of connection. Others have independent connectors which allow you to select the location of the connector that is best suited for your needs. The connector can also be moved at a later time. This allows you to get more life out of your bag.
Other Considerations
Filters: They are essential with electric pumps. Some vacuum pump manufacturers build their pumps with an internal filter. However, an external filter is also strongly recommended. Most vacuum pumps used in the woodworking industry are rotary vane types and the clearance between the vanes and the sidewalls is only .0002". Therefore, the incoming vacuum air must be filtered. If small particles enter the vacuum chamber, they could cause the vanes to stick or break.
It's good practice to flush the pump chamber with fresh air for 1 - 2 minutes at the end of the day. Glue vapors can build up along the wall and cause the vanes to stick. The next time the pump is turned on it may not spin causing the motor to over-heat and shut off, or worse, snap the vanes. Most manufactures will recommend periodic flushing of the vacuum chamber with a liquid to clean the insides.
Air-powered vacuum pumps do not normally need filtration like electric units. Dust drawn into the vacuum line will normally pass through the unit. A buildup inside the pump can occur if the airline contains oil from the compressor. Two piece pumps made for the woodworking industry can be disassembled, flushed out and reassembled in a few minutes. If a few strands of course steel wool are put in the vacuum line, they will trap large chips and allow the dust to blow through. If you decide to filter a vacuum system always use a filter with a clear bowl. It allows you the see the screen and clean it before it gets clogged.
If you use a filter on the vacuum line, it is normally placed between the bag and the vacuum gauge. If the filter gets clogged, it will cause a false reading of the vacuum level in the bag. The vacuum gauge and vacuum sensor are on the other side of the filter. Thus, you can have in essence, two vacuum systems caused by a clogged filter. One will be from the filter to the bag, the other from the filter to the pump, which includes the vacuum gauge and sensor. When the pump cycles on, it evacuates the line up to the clogged filter and the sensor then turns the pump off. The gauge is reading high vacuum, however, on the other side of the filter, in the bag, nothing happened. Thus, be aware that a dirty or clogged filter can cause a problem and must be kept clean.
Vacuum Tanks: A tank acts as a reserve in cases of a power failure or, in the case of an electric pump, stretches out the on/off cycles with a leaking bag. If a leak were causing the electric pump to cycle on/off every 15 seconds, a tank could stretch the cycles to 5 minutes before turning the pump on.
A tank is also used where a fast vacuum draw down is needed. For example, consider the case where you have a small vacuum pump and later purchase a large frame press. Because a frame press has a large surface area to seal (a 4' X 10' frame press has 28' to seal verses a bag with 4' to seal), using a vacuum tank could make a difference on getting the initial seal. The tank gives a large initial vacuum flow, which pulls the frame down to the table and provides the perimeter seal needed by the small pump.
A tank is also used where a fast vacuum draw down is needed. For example, consider the case where you have a small vacuum pump and later purchase a large frame press. Because a frame press has a large surface area to seal (a 4' X 10' frame press has 28' to seal verses a bag with 4' to seal), using a vacuum tank could make a difference on getting the initial seal. The tank gives a large initial vacuum flow, which pulls the frame down to the table and provides the perimeter seal needed by the small pump.
Accessory Tools: Two tools are available that can speed the veneering process. A glue spreader and a veneer hand paper taper. The spreader will also lay down a nice even layer of glue. If a brush, trowel, paint roller is used, you can get excessive glue in spots. With a vacuum press, excessive glue gets squeezed out because of the 1800 lbs./sq.ft. of pressing force. This creates more work as the dried glue must be periodically cleaned from the bag. Some spreaders hold up to two quarts of glue and this will just about cover a 4' X 8' sheet. You will quickly learn what is the correct amount of glue to apply and will eventually reduce your glue costs. A storage container for the spreader is also a good investment as it allows you to store the spreader without allowing the glue to dry and form a crust on the roller. It can even be stored overnight, thus clean-up is only necessary when you are through with the job.
For a small shop doing panels, a hand veneer taper is a good investment. They are designed to wet the paper tape, pull the two pieces of veneer together and roll the tape over the seam. Anyone doing hand taping of veneers for panels should consider this tool.
For a small shop doing panels, a hand veneer taper is a good investment. They are designed to wet the paper tape, pull the two pieces of veneer together and roll the tape over the seam. Anyone doing hand taping of veneers for panels should consider this tool.
Glue Considerations: Many ask what kind of glues can be used in the bag. From the vacuum bags point of view, it doesn't care about the glue because it will still do its job of applying 1800 lbs./sq.ft. of force. Some glues, require special consideration. For example, polyurethane glues and epoxies will stick to the bag. If they are used, then a slip-sheet of nylon or some material that the glues will not adhere to is needed between the bag and glue squeeze out areas. Also, polyurethane glues need moisture (humidity in the air) to cure. The vacuum; removes most of the air, therefore, the manufacturers recommend that your substrate be moistened with water. Cleaning the bag of dried glue is recommended. Most of it will crinkle off. You must remove any dried glue that formed a pointed sliver. This normally occurs when glue is forced into a crease in the bag.
Urea glue is normally recommended for laminating and veneering. Urea glues cure by a chemical reaction as compared to white or yellow glue, which cures by the water migrating away from the joint. Urea glue, gives a very rigid glue joint, thus minimal or no spring back on curved work. Because it is so hard, it sands easily without gumming the sandpaper. Another advantage is its ability to never soften under heat. If your finished piece is placed next to a sunny window or in a trailer in 120 degrees, it won't soften or delaminate. It also affords a type II waterproof bond and is available in powder or liquid form. The powders will keep for 12 months, the liquids for 3 to 6 months depending on the temperature.
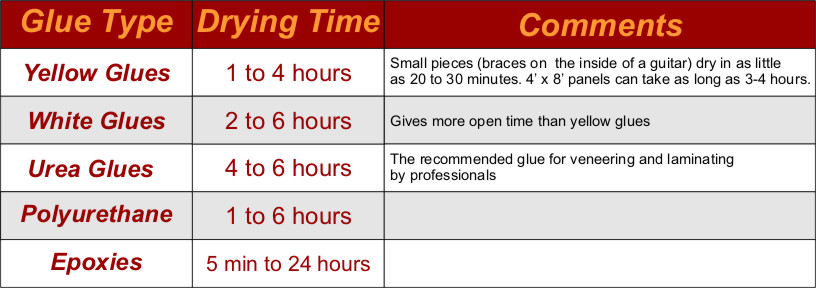
The drying time is affected by several factors such as the type of glue, surface area being glued, wood being glued, and shop temperature. Yellow glue drying time will range from 20 minutes to 3 hours. White glues, which typically give more open time, will take from 1 to 4 hours to dry. The urea formaldehyde glues normally are 4 -6 hours and must sit overnight before being machined. The higher the temperature the faster it dries. Some shops use a household electric blanket over the bag and it can reduce drying time significantly, especially cold shops in the winter.
Many laminations of hardwood will take longer to dry compared to the same number of bending plywood laminations. The reason being that bending ply is more porous than the hardwoods as most water based glues dry by the water wicking away through the substrate. Hardwoods don't wick away the water very quickly. If using an epoxy or other type of glue that hardens by a chemical reaction, then the substrate material is normally not important with regards to drying time.
When gluing large panel's (4x8), consider leaving it in the bag a little longer than normal. What some have experienced is the center of the panel not drying as fast as the outer part. This has shown up especially where the veneer is taped down the center of the panel.
Urea glue is normally recommended for laminating and veneering. Urea glues cure by a chemical reaction as compared to white or yellow glue, which cures by the water migrating away from the joint. Urea glue, gives a very rigid glue joint, thus minimal or no spring back on curved work. Because it is so hard, it sands easily without gumming the sandpaper. Another advantage is its ability to never soften under heat. If your finished piece is placed next to a sunny window or in a trailer in 120 degrees, it won't soften or delaminate. It also affords a type II waterproof bond and is available in powder or liquid form. The powders will keep for 12 months, the liquids for 3 to 6 months depending on the temperature.
The drying time is affected by several factors such as the type of glue, surface area being glued, wood being glued, and shop temperature. Yellow glue drying time will range from 20 minutes to 3 hours. White glues, which typically give more open time, will take from 1 to 4 hours to dry. The urea formaldehyde glues normally are 4 -6 hours and must sit overnight before being machined. The higher the temperature the faster it dries. Some shops use a household electric blanket over the bag and it can reduce drying time significantly, especially cold shops in the winter.
Many laminations of hardwood will take longer to dry compared to the same number of bending plywood laminations. The reason being that bending ply is more porous than the hardwoods as most water based glues dry by the water wicking away through the substrate. Hardwoods don't wick away the water very quickly. If using an epoxy or other type of glue that hardens by a chemical reaction, then the substrate material is normally not important with regards to drying time.
When gluing large panel's (4x8), consider leaving it in the bag a little longer than normal. What some have experienced is the center of the panel not drying as fast as the outer part. This has shown up especially where the veneer is taped down the center of the panel.
Veneer Tape: Always know the effect of the tape used to hold the veneer pieces together. Never use masking tape, as it can be very difficult to get off. In addition, masking tape is thick and will leave an impression in the veneer.
Cost Justification: The labor cost of having someone lay-up a 4X8 panel with paperback veneer is in the $50 to $80 range. To lay-up a 4x8 from a flitch will cost $80 to $120. Also added into the cost is shipping the panels back to your shop. It doesn't take many panels to pay for the equipment. Other considerations for a system are that you now control the quality and timeliness of the job.
Vacuum Clamping: Vacuum clamping is probably the most helpful, economical and time saving tool that very few woodworkers know about or use. Most woodworkers just do not take the time to try it. However, when they do, it's like a revelation.
Comments like "I didn't know how to get clamps on the piece (odd shaped curved piece), so I made a vacuum clamp and it worked!" "I made four right angle vacuum jigs to hold a cabinet together while I assemble it. For a typical kitchen job, it cuts my assembly time down by 2 hours". "I've been doing vacuum pressing for two years and decided to try template routing with a vacuum template. I had 50 pieces to make and not only was it fast, but all my pieces came out the same". "I had a quick routing job to do, by holding the piece with a vacuum jig; I can finish the job before I could get set up with mechanical clamps. Also, with the vacuum jig, I don't accidentally dent or mar the work piece and then have to rework it".
Comments like "I didn't know how to get clamps on the piece (odd shaped curved piece), so I made a vacuum clamp and it worked!" "I made four right angle vacuum jigs to hold a cabinet together while I assemble it. For a typical kitchen job, it cuts my assembly time down by 2 hours". "I've been doing vacuum pressing for two years and decided to try template routing with a vacuum template. I had 50 pieces to make and not only was it fast, but all my pieces came out the same". "I had a quick routing job to do, by holding the piece with a vacuum jig; I can finish the job before I could get set up with mechanical clamps. Also, with the vacuum jig, I don't accidentally dent or mar the work piece and then have to rework it".
What is vacuum clamping? The ability to hold a work piece with up to 1800 lbs/sq.ft. of clamping force. The holding force is on one side only and does not introduce physical obstructions on the edges or other side.
Advantages of vacuum clamping over mechanical clamping:
Disadvantages of a vacuum clamp.
Advantages of vacuum clamping over mechanical clamping:
- Doesn't mar the work piece - The vacuum tape (special foam tape that gives an air tight seal between the vacuum jig and the work piece) protects the work piece.
- Fast - Vacuum is instant on\instant off. Template rout around a piece in one pass, with mechanical clamps you need to remove the clamps and re-clamp the work piece. No need to use double sided tape or screw the template to the work piece, no cleanup or filling holes required.
- Accurate - Because you do not have to remove and reset the clamps, you get a true reproduction every time. This is extremely important when make several mating parts, as all will be interchangeable, all will fit together.
- Low Cost - Make your own basic or unique vacuum jigs to handle day to day operations or special projects.
- Strong - Up to 1800 lbs/sq.ft. of force, much more force than can be applied with typical mechanical clamps.
- Even and Uniform Pressure - Mechanical clamps provide a point source for the force to hold. A typical mechanical clamp provides 200 - 300 pounds of force at the point of contact. If you are holding a 6" square piece of 3/4" pine with a mechanical clamp, it averages about 8.5 lbs/sq.in. Where a vacuum clamp would typically give 10 - 12 lbs./sq. of even and uniform holding force.
- Safe - No obstruction to interfere with the cutting tool. In some cases a cutting tool would come close to a mechanical clamp and present a danger to the operator and equipment if the tool hit the mechanical clamp.
- Versatile - Can attach a vacuum clamp on any flat surface, horizontal or vertical. For example, to hold a straight edge to a 4 X 8 sheet, the mechanical clamps must be at the edges in order to grip the sheet and straight edge. With a vacuum straight edge, it can be placed anywhere on the sheet and when vacuum is applied it will pull straight down. The vacuum jig does not have to be near the edge.
- Can rout the complete edge of a piece- because the vacuum jig holds the work piece off the bench top unlike a routing mat.
- Jigs are lighter in weight - Some two man shaper operations can be reduced to one man because of reduced weight.
Disadvantages of a vacuum clamp.
- Work piece needs to be relatively flat - some cupping is acceptable as the gasket tape not only provides a seal but also permits some unevenness.
- Less force on small pieces - A mechanical clamp can apply more total force on a small piece.
- Very porous material can result in low holding force - cracks and knots present leakage and a large vacuum pump maybe needed to overcome this leakage and give an acceptable holding force.
Vacuum clamping considerations: In virtually all cases, the vacuum pump is always kept on when vacuum clamping. The reason for this is safety. Take a common vacuum clamping application like template routing. Most woods or wood products are porous; therefore, they leak or don't hold vacuum. Shutting the pump off at a high vacuum level will only mean it will cycle on and off. However, this is not the big concern, the major issue is will the pump come on and pull enough vacuum before the work piece breaks loose. The routing process puts lateral stress on the work piece. A drop in holding force could be enough for the piece to break loose before the pump starts and regenerates enough vacuum level to hold the piece securely in place.
Air-Powered vs. Electric Vacuum Pumps for Vacuum Clamping: Either style pump is used for vacuum clamping, although the air-powered units have several advantages over an electric system.
Air-Powered Advantages:
Electric Pump Advantages:
Air-Powered Advantages:
- Reliability- No moving parts means nothing to break, wear out or over heat and shut off. Can be cycled on and off thousands of times without causing it to overheat or damage any parts.
- Lower cost- About 1/3 to half the cost of an equivalent electric pump.
- Upgradeable- Some venders can upgrade a smaller unit to larger capacity with losing your original investment.
Electric Pump Advantages:
- Convenience- Plug it in anywhere, does not need a compressor.
Factors to consider in selecting a vacuum system:
Remember, innovative uses of vacuum will give any shop an edge over their competition.
- Function: What is it to do? Vacuum veneering, vacuum clamping, both? Other applications like degassing a liquid (epoxy resin, etc.). Run multiple bags or frame presses?
- Physical Size: Will it take up floor space or can it be tucked away under a bench?
- Reliability: What is the life of the pump, the expected bag life? If the pump ingests sawdust or chips, will it break or just need cleaning?
- Maintenance: How much maintenance will it require, are parts readily available, cost of parts, can you service it yourself or must it be returned to the factory?
- Warranty: What is the warranty period for the pump, the bag seams? Some venders give a lifetime warranty on certain products. Warranty on component parts?
- Vendor support: Does the vender have a hot line or 800 number for problems related to the equipment or how to use the equipment? Will they return calls after hours or on weekends? This is important, especially when an equipment problem occurs and you have little or no knowledge of the system and how it works.
- Convenience: How easy is it to use? Can it be moved around the shop?
- Upgradeable: Can its performance and functions be increased later? What are the costs? If it's a manual system, can it be upgraded to a fully automatic system?
- Motive Force: Air-Powered or Electric Vacuum Pumps.
- Performance: How high a vacuum level (how much force) do you need? How fast of an evacuation time is needed to get the work piece under pressure?
- Cost and Selection: Is there a range of pumps, bags, frame presses, accessories, components parts, etc. to choose from.
Remember, innovative uses of vacuum will give any shop an edge over their competition.
What kind of Glue should I use in a vacuum Press? There are many types of glues on the market and which type you use with a bag press will depend on your needs. In general, a vacuum bag does not care which glue is used, it will press all glues with 1800 pounds per square foot of pressure. There are two concerns regarding gluing in a bag that you should be aware of.
First, will the squeeze out stick to the bag. Normally yellow, white or urea type glues will not. The polyurethane glue or epoxies will. Therefore the bag must be protected with a slip-sheet material (wax paper, etc.) that traps the glue. The second consideration is whether the glue needs air or moisture to cure. This is true of the polyurethane glues. They need moisture in a normal glue-up, the moisture comes from the surrounding atmosphere. What polyurethane glue manufactures recommend is to wet the substrate (not the veneer, it will wrinkle) before applying the poly glue, thus it has sufficient moisture to cure when in a vacuum bag.
First, will the squeeze out stick to the bag. Normally yellow, white or urea type glues will not. The polyurethane glue or epoxies will. Therefore the bag must be protected with a slip-sheet material (wax paper, etc.) that traps the glue. The second consideration is whether the glue needs air or moisture to cure. This is true of the polyurethane glues. They need moisture in a normal glue-up, the moisture comes from the surrounding atmosphere. What polyurethane glue manufactures recommend is to wet the substrate (not the veneer, it will wrinkle) before applying the poly glue, thus it has sufficient moisture to cure when in a vacuum bag.
How long does it take for the glue to dry? Drying time normally depends on several factors:
Drying times You can usually speed up the drying time by putting an electric blanket over the vacuum bag. This can raise the temperature to 90 to 100º and cut the normal drying time in half. The following are typical drying times for a shop at 70º and using a substrate that is not a solid hardwood, i.e., MDF:
- Type of glue- generally, the more open time the glue allows, the longer the set time
- Temperature of the shop- the warmer the shop, the faster the set time
- Substrate material- With typical water based glues, the water will be absorbed into MDF, particle board, etc., faster than a solid wood like oak, and therefore, the drying time is shorter.
Drying times You can usually speed up the drying time by putting an electric blanket over the vacuum bag. This can raise the temperature to 90 to 100º and cut the normal drying time in half. The following are typical drying times for a shop at 70º and using a substrate that is not a solid hardwood, i.e., MDF:
Differences Most of the yellow and white glues dry by water migrating away from the joint, thus the solids form a bond. If water gets back to the joint, then the bond softens or lets go. The urea's, poly and epoxies harden due to a chemical reaction. These glues provide better water and heat protection and generally have a type 2 or better waterproofing capability. These glues also have little or no creep associated with them. They are better to use with curved pieces as this minimizes or eliminates spring back. The reason for this is that the urea, poly or epoxies cure by a chemical reaction as opposed to the water migrating away from the joint. A hard glue joint is created.
Typical Glue Problems
My veneer came out wrinkled!
If you had a caul on top of the veneer and it's wrinkled, generally the problem is due to the glue not drying. This can be especially true when doing large panels. Comments like "it was wrinkled in the center of the panel" , or "it was wrinkled in areas where the veneer was spliced with veneering tape". These comments come from users of yellow and white glues. This can also happen if the shop is too cold. Normal drying time might be 2 hours, however, at 60º, you might need 4 to 8 hours of drying time.
If a caul was not used on top of the veneer (bag directly on the veneer), this could be the cause of wrinkles. The caul is needed to flatten the veneer.
I have a complex shape and making a caul is a problem!
If you have a complex shape and stiff cauls can't be used, try flexible materials. Linoleum, bending plywood (wax the surface so glue doesn't stick to it), plastic laminate, etc. Be creative, as the use of a caul is very important. If you can't use a caul, roll the lumps and bumps out with a hard rubber roller.
My MDF veneered door cupped as soon as I took it out of the bag!
This is usually due to veneering only one side. The MDF still has moisture from the glue on the veneered side. You must veneer both sides for proper moisture balance. The back side does not have to be the same type of veneer as the front.
My curved jambs did not dry!
If you are making arches, curved staircases, etc., from solid hardwoods using yellow or white glues, it can take an extensive amount of time for the water to migrate away from the joint and vaporize in the vacuum bag. Six layers that have been glued on every surface involves lots of water and it doesn't get absorbed or move to the edges very fast. If every other layer can be bending ply, will absorb the water and dry faster. If not try the urea, poly or epoxies as they cure due to a chemical reaction not evaporation. Also try adding heat with an electric blanket.
Quality VAKuum Products, Inc.
74 Apsley Street Hudson, MA 01749
Phone: (978)562-4680
Fax: (978)562-4681
74 Apsley Street Hudson, MA 01749
Phone: (978)562-4680
Fax: (978)562-4681